Get a Grip! On Your Indoor Rower
The handle, along with the foot stretchers and seat, connect the indoor rower to your body. Let’s look in depth at the handle and grip.
Depending on the model of your indoor rower, the handle is either a straight wooden handle with foam grips or an ergonomic plastic handle with rubber grips. The ergonomic plastic handle features a 10 degree bend that allows you to row with a natural arm and hand position. If you want to retrofit your Model A, B or C with the newer design, the handle is an inexpensive upgrade that may improve your comfort.
On the indoor rower, as in a boat, your grip should be loose and comfortable. Tension in the hands or a “death grip” can tighten the forearm muscles and put undue stress on small, easily fatigued muscle groups. The work should be done by the larger, stronger muscle groups of the lats and legs. Think of your hands as a hook and your arms as a cable connecting the handle to the legs; the legs should do the work at the catch of the stroke. On the drive, the hands “hang” on the handle, similar to the starting hang position of a pull-up. It is only in the second half of the drive that the arms really start to draw in the handle.
Hands should be approximately shoulder-width apart. The thumb should wrap around the handle and be loose enough to be able to pick up fingers while rowing. This can be an effective drill! See if you can pick up each finger, like you’re tapping on a keyboard, for a few practice strokes. This drill should be done during the work portion (“drive”) of the stroke. As shown in our Common Errors video (starting at 0:23), over-gripping the handle squeezes the handle and puts the wrists in a poor position. Similar to a proper typing position, wrists should stay flat.
The handle should move in a smooth, horizontal, even plane. Many novices envision a traditional rowboat and think they need to move the handle in an arc. The Concept2 Indoor Rower lets athletes simplify hand motions and instead, focuses on fitness. Keep the chain level. There are two bolts on the indoor rower’s chain guide that can, literally, guide your chain.
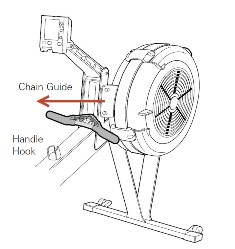
Use the mid-distance between these two bolts as a guide in and out of each stroke to help keep the chain level. Many coaches use the analogy of running your hands along a table with the chain. This is how level the chain should be during the entire stroke.
Overgripping and rotating the handle can lead to hand blisters. To avoid blisters, be sure to follow our grip recommendations and also build up your duration on the indoor rower gradually. A sudden “long row” or excessively sweaty or wet conditions can rip skin. Purists in the sport do not use gloves. Since the handle is your connection to the indoor rower, most athletes want to feel this connection and see the glove as an impediment. If you choose to wear gloves, try to use thin ones. Thick gloves effectively increase the diameter of the handle, which may make it harder to grasp. Calluses develop over time and are often a proud mark of your rowing accomplishments.
If you have questions on your grip on the indoor rower, give us a call or email info@concept2.com.au. We’re always happy to help!
Additional information on Getting Comfortable on the Indoor Rower may also be helpful as you find your optimal positon.